Contact Us
Writable PDF FAQ General Questions about Writable PDF Files
What are writable PDF files?
These are PDF files where you can complete certain sections. You will see gray areas where you can fill in your name, date, school, or other information. Simply click on the area and start typing. They also allow for electronic signatures in some text fields.
Why are we using writable PDF files?
Using electronic forms over paper provides many advantages. It is easier to submit, process, store, and keep backup copies. Another advantage of these electronic forms is that the applicant can email it to an individual who needs to sign and it can be returned to the applicant also by email. This makes the process of getting signatures much easier than tracking down a person's physical location.
Do I need to buy software to use this?
No. Adobe Reader is free and will allow you to write on writable PDFs. Click here to download a copy. Adobe Reader will also allow for electronic signatures. NOTE: that some Macs do not automatically come with Adobe Reader, but the software can be downloaded for free.
Can I edit if I make a mistake?
Yes. You can backspace, highlight and replace, cut, copy, and paste. Most of the keyboard shortcuts (e.g. control-x for cut) will work as well.
Can I save my work?
Yes. You need to have entered text in at least one text field (and moved to another one) before you can save. There is an icon of a floppy disk near the top of the PDF document which will save if you click on it. You can also find the save command in the file menu.
Will I be able to use it on a mobile device, such as a smartphone or tablet?
Certain writable features are possible if the correct apps are downloaded to your mobile device, but full functionality is difficult or impossible depending upon what device you have. It is best to use a computer for writable PDF forms.
I opened the writable PDF on my computer, but I cannot write on it. What do I do?
You may be experiencing problems for a few reasons. First, you may have an old version of Adobe Reader. This software can be updated for free. Click here to upgrade your software.
Second, other programs will display PDFs but not allow you to complete forms. Using Adobe Reader will ensure that you can open and complete all forms.
Additionally, the way your internet browser interacts with PDF files could cause you to experience an issue. Some browsers will not open a new window running Adobe Acrobat Reader when processing a PDF file, but rather will open the PDF file inside of the browser. This may interfere with the writable feature of the document. To get around this, you need to tell the browser you want to open the document in Adobe Reader outside of the browser. Instructions on how to do this can be found here.
Can my electronic signature be forged?
In the same way that a physical signature could be forged, yes, it is possible. However, the costs of forging a signature on our forms far exceeds the benefits. Read the instructions for people who need signatures for more information.
I'm more comfortable just printing it out, signing it with a pen, and scanning it back in. Is this OK?
Yes, but it's not ideal for a couple reasons. First, after you've set up a Digital ID the first time, you'll realize this is much more work than signing it electronically, which only takes a few seconds. Second, the resultant PDF file you scan in loses writable features. If others have to sign the document after you, you've forced them to do the same thing you've done. This is extra work for others and there is degradation in quality of the text after multiple scannings. We strongly discourage printing out and scanning in unless you are the last person who needs to sign.
Information for those needing to sign PDF documents
What do I do the first time I try to sign?
When you sign a document in Adobe Reader for the first time, you need to create a Digital ID.
Follow the steps below to create the Digital ID
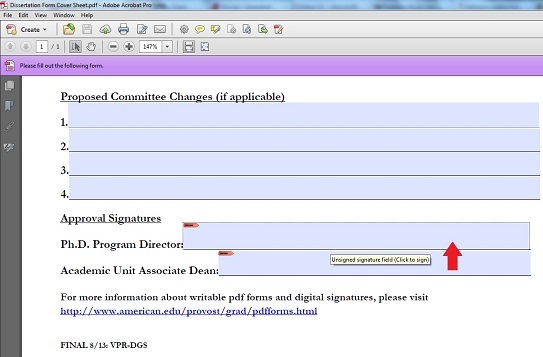
1. Click on the area where you are supposed to sign. You should not start typing, rather simply click on the area for a signature.
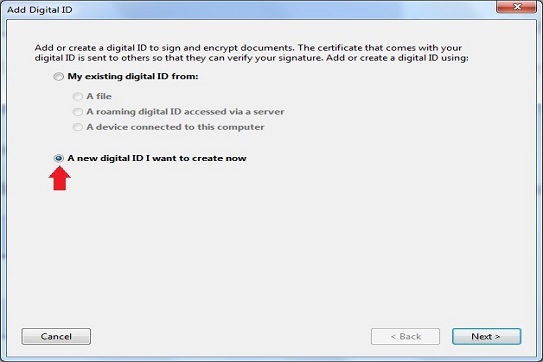
2. The first popup screen will ask you to Add a Digital ID. Select "A new digital ID I want to create now" and click on "Next."
3. You will be asked where to store your new digital ID. You will be able to use this ID each time you sign into your computer. Select New PCKS#12 digital ID file and then click on "Next."
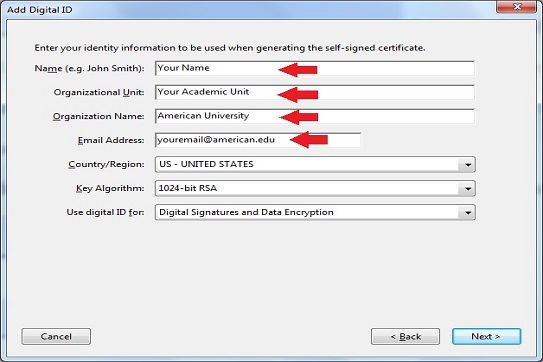
4. Next you will be asked about information for your digital ID. The first four text fields will be blank. Put in your name, your Academic Unit, American University, and your email, respectively. Do not change the next three pull down menus, which should be US - United States, 1024-bit RSA, and Digital Signatures and Data Encryption.
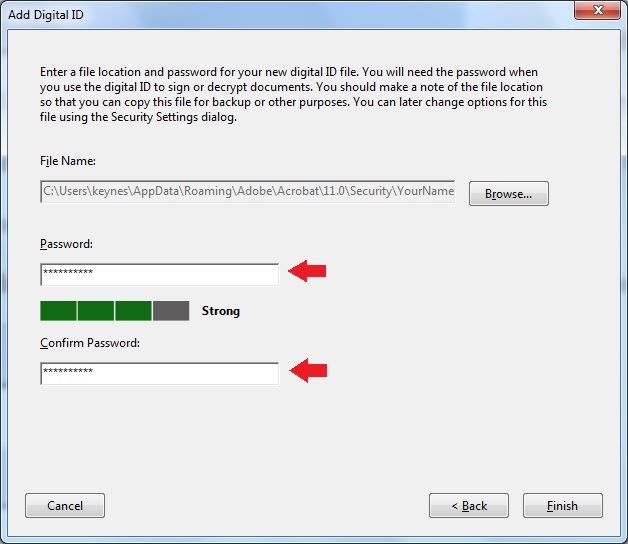
5. You will be prompted for a password. Type in a password - Adobe Acrobat Reader will assess the strength of the password. Do not change the File name listed above the passwords. When you are done, click on Finish.
6. Adobe Acrobat Reader will show you what your signature is going to look like. You should select "Standard Text" as the Appearance. Before you are done, you'll need to re-enter your password to sign the document. Then select sign.
Note: Once you have created a Digital ID, your computer will skip all the previous steps and go directly to this one in subsequent electronic signings.
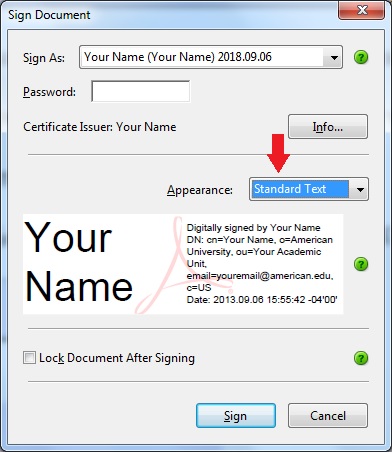
7. Adobe Acrobat Reader will ask you to immediately save the document once you sign it. If you've downloaded this from a mail program, such as Lotus Notes, your computer might save the file in a location that is not intuitive. Before saving the file, be sure you save it in a location you can find it again, such as your desktop or a location you commonly place files.
What happens if I make a mistake setting up my digital ID?
Digital IDs can be erased and created at any time. You can do this if you made a mistake setting up your Digital ID and want create a new one from scratch.
1. On a PC, under the Edit menu, select Preferences. On a Mac, Preferences is under the Acrobat menu. Once you have selected Preferences, a large window will appear. Select "Signatures" from the options on the left.
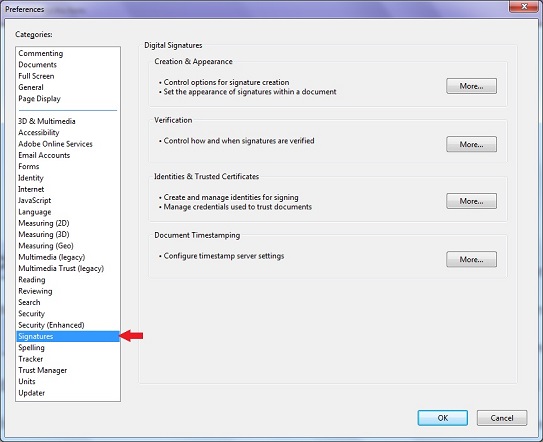
2. If you want to delete a signature you'd created, select "More…" under Identities & Trusted Certificates.
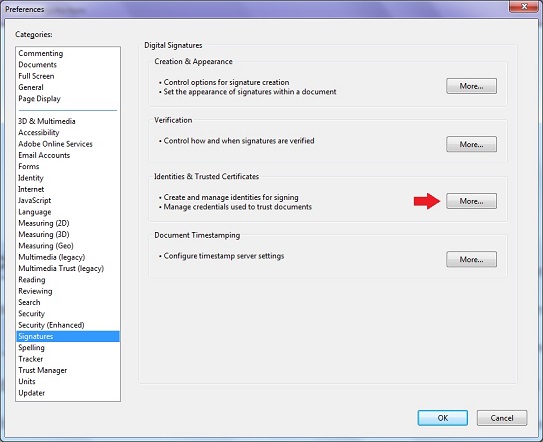
A new window will appear. On the left, you will see Digital IDs. If there is a "+" next to it, click on it so it is a "-." Next, find "Digital ID Files" and change the + to a -. You'll see all the Digital ID files (with .pfx suffixes) stored on that computer. Select the one you want to get rid of and then click on "Remove ID" in the upper right. It will ask you to put in your password before deleting the file. When you are done, click on the "X" in the upper right corner.
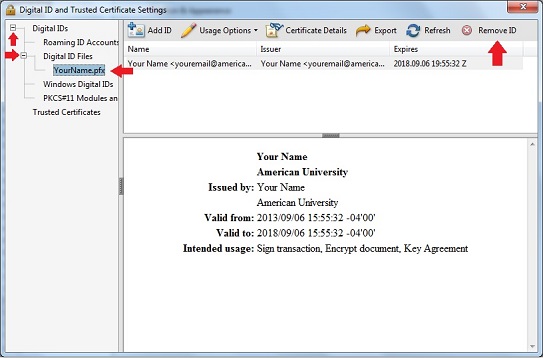
3. To create a new Digital ID, click "More…" under Identities & Trusted Certificates.
When the new window appears, click on "Digital IDs" on the left. Then select Add ID. Follow the directions from Step 2 in creating an ID for the first time on this FAQ page.

What do I do after I've set up my digital ID?
This is the easy part. Every time you sign a writable PDF file, the Digital ID you created will come up automatically, as long as you are using the same computer when you created it. You should not create a Digital ID on public computers or computers where you do not know who has access to the files on it.
It's fine to create the same Digital ID two different computers, such as a home computer and a work computer, as long as access to both are limited.
Information for Those Obtaining Signatures
Read these directions carefully before you get others to sign your document:
1. Finish entering in all data before you ask for signatures. If you are one of the people that needs to sign, sign it first.
2. If the document has more than one signature (besides yourself) needed, send the document by email to individual signers one at a time. This process is identical to what you'd do with a physical document, except that it is being sent by email. You cannot cut and paste electronic signatures – this is why you need to use one document sent to one individual at a time.
3. Have each individual signer send the document back to you via email rather than send it to the next person. Do not delete the email that you receive from the signer. This will serve as proof that no forgery was involved. After you've received it, send it to the next person you need for a signature.
4. Do NOT forge an electronic signature. It is likely you will be caught because the signers will be informed of any decisions made about your application. If you cannot produce the email from the signer to you with the signed document attached, your application may be taken out of consideration. Furthermore, it is an academic code violation to forge a signature for these documents. You will not only forfeit your eligibility to whatever you are applying for, you will also put your academic career in jeopardy.
